Showing posts with label Mission. Show all posts

Tuesday, 31 January 2017

Jali By Night - a counter-terrorist mission

Here's a two-player scenario with a small twist, which ideally needs an umpire to preserve the fog of war. A terrorist cell has been active; the local counter-terrorism teams are keeping a close eye on them, waiting to round up the entire network. However, special forces from a foreign power have been assigned to kill or capture the terrorists... The terrorists are unaware that they are under observation; the counter terrorist teams are unaware of the special forces; and the special forces are unaware of the counter terrorist teams. In the confusion, the terrorists *might* just escape...

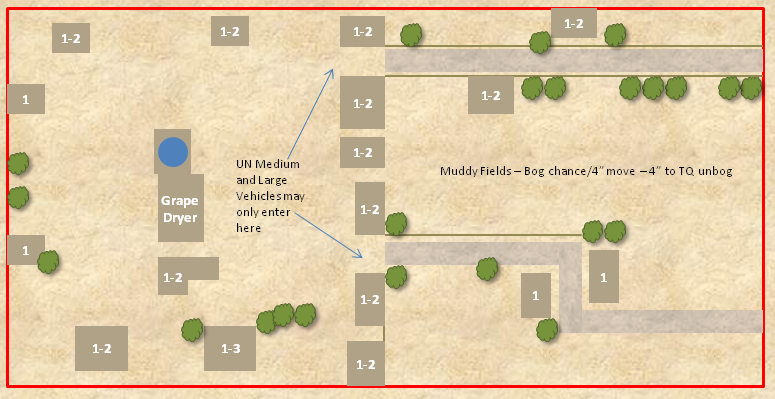
Set the hot spots up (mid-point of bottom edge; bottom right corner; mid-point of left edge; top right corner; mid-point of right edge), then place the terrorists in a building towards the centre of the board. Next get the counter-terrorist teams to designate their set up; they should be in line of sight of the terrorists, but at least 6" away. Teams may be spread out, one team per building. Do not place them on the table yet. Next, get the Westerosians to set up in the top left corner (their alternative exfiltration point is the bottom right corner), and start the game.

Encourage the Khymerians and the Westerosians to believe that their only opponents are terrorists for as long as is possible. Be aware that the UAV is likely to spot Khymerian movements in the open or on roofs.

Jali By Night


Khymerian Briefing
Western tourists have always been an easy target of religious fanatics, and the detonation of bombs in a Farkarta nightclub was no exception. There were 57 killed (12 of them being Westerosian), and many wounded, the majority being local Khymerese. Relationships between Khymeria and Westeros have broken down, with the Westerosian government blaming official Khymerian collusion with the bombers, which is patently false.
Khymerian Intelligence has identified the perpetrator as Ali Bebak, and has tracked him down to a hideout in the town of Jali. He is under observation by Pokassus Counter Terrorism teams to see who he contacts, in order to try to snare all of his network in the one go.

Scenario Information
Duration of Game: 8 turns
Initiative: Dice from turn after shooting starts, or after Westerosians identified by Khymerians.

Mission
Watch Ali Bebak to see who he contacts, and capture or kill him and his network in its entirety.*

Victory Points
·         Each terrorist captured: 5 points
·         Each terrorist killed: 1 point
·         Ali Bebak captured: 10 points
·         Ali Bebak killed: 5 points (N.B. need to spend 1 turn with body to positively ID)

Force
Initiative level: D8
Confidence Level: Confident
Supply Level: Abundant
Body Armour: Standard (+1D)
Troop Quality/Morale: D8/D10
All Pokassus operators are equipped with Night Vision Goggles (NVG).

Team One
Team Two
Team Three
1x Lieutenant with AK-74 and Pistol (Medic)


1x Team Leader w/AK-74
1x Gunner w/PKM SAW (Med. AP:2/ AT:0)
1x Operator w/AK-74
1x Operator w/AK-74
1x Operator w/AK-74
1x Operator w/AK-74
1x Operator w/AK-74
1x Operator w/AK-74

*Once the shooting starts, or Westerosian forces are spotted by the Khymerians, the Khymerian mission changes to...

Take Ali Bebak captive, and prevent Westerosians from removing him; take Westerosians captive if possible, or get hard evidence of their violation of Khymerian territory (body).

Additional Victory Points (as  well as existing)
·         Each Westerosian captured: 10 points
·         Each Westerosian killed: 1 point

Terrorist Cell Briefing (Very brief - this side is best played by the umpire)

Scenario Information
Duration of Game: 8 turns
Initiative: Non-initiative player

Mission
Wait for expected contacts to arrive; if attacked, leave board by any edge.

Victory Points
·         Ali Bebak escapes table: 20 points
·         Ali Bebak alive at end of game: 5 points 

Force
Initiative level: D8
Confidence Level: Confident
Supply Level: Abundant
Body Armour: None
Troop Quality/Morale: D6/D6 Irregulars

Ali Bebak – Leader, TQ/Morale D6/D10, armed with AK-74.
5x Riflemen – TQ/Morale D6/D6, armed with AK-74 (take morale from Ali Bebak if he still alive).

Reinforcements – Once alarm is raised (gunfire), 1D6 AK-74 Irregulars are generated on a hotspot. TQ/Morale D6/D6. Add a Leader to the team on a 4+.

Westerosian Briefing
Western tourists have always been an easy target of religious fanatics, and the detonation of bombs in a Khymerese nightclub was no exception. There were 57 killed (12 of them being Westerosian) and 20 wounded; there was predictable outrage in Westerosia. The Khymerian authorities seemed to lack the will to prevent the bombers – led by the known terrorist Ali Bebak – from striking again, despite the Westerosian Intelligence Agency identifying the suspects and probable whereabouts to their Khymerian opposite numbers. Frustrated by this, and feeling the need to ‘do something’, the Westerosian government has decided to authorise a covert mission to capture or kill Ali Bebak on Khymerian soil.

Scenario Information
Duration of Game: 8 turns
Initiative: Westerosian player starts with initiative. Dice from turn after shooting starts, or after Westerosians identified.

Mission
Insert ground elements by night, capture or kill all identified terrorists, and exfiltrate back across the border before the Khymerian authorities can react. (Either exfiltrate back to where you started, or the opposite board corner). A small unarmed drone is in an overhead orbit providing vision to your command and control element, and cancelling any terrorist Out of Contact movement. For obvious reasons, you must ensure that no man is left behind – the Westerosian government will deny any involvement.

Victory Points
·         Each terrorist captured: 5 points
·         Each terrorist killed: 1 point
·         Ali Bebak captured: 10 points
·         Ali Bebak killed: 5 points
·         All ground elements in one of the exfil zones by end of turn 8: 5 points

Force
Initiative level: D10
Confidence Level: High
Supply Level: Abundant
Body Armour: Standard (+1D)
Troop Quality/Morale: D10/D10

All operators are equipped with Night Vision Goggles (NVG), suppressed weapons (-1D to shooting; N.B. the F89 is not suppressed, nor is the Benelli Shotgun), and flashbang stun grenades. Each team has one breaching charge. Operators have Advanced First Aid, are Stealthy and need to be spotted to shoot at.

Element Alpha
Element Bravo


1x Team Leader w/F88
1x Grenadier w/F88/GLA (Lt. AP:1/ AT:0)
1x Gunner w/F89 SAW (Lt. AP:1/ AT:0)*
1x Operator w/SR-25 DMR and Benelli Shotgun*


Sunday, 8 January 2017

Malikastan Mission Briefing - A Tale of 2 City Fights

It was not the best of times, it was the worst of times, it was not the age of wisdom, it was the age of foolishness, it was the epoch of unquestioning belief, it was the epoch of incredulity, it was the season of Light, it was the season of Darkness, it had been the spring of hope, it was now the winter of despair, we had had everything before us, we now knew we had nothing before us, they all thought they were going direct to Heaven, but they were merely turning to dust—in short, the period was so far back to jingoistic isolationism, that some of its noisiest authorities tweeted on it being finished by Christmas.

December 24 2019
The forces of the world, some under the umbrella of the UN, some under independent command and now encircled the garden city of Hotaki in Malikastan.  The fanatical followers of the long dead Hotaki saw that his prophecy of the "coming of the Franks" was upon them, and when the "Franks" entered the tomb of Hotaki all the warriors of Hotaki who had died over the last several hundred years would rise from their graves and bring on the final days.  Hotaki warriors sat in their prepared positions contemplating their rewards or contemplating on the joy of seeing their many fallen comrades join them once more with tales of Paradise.

A week ago, on a cold winter's morning, the pincer movement of the two vanguard armies entered the City of Hotaki.  The British had offered the name for the operation as Operation Put-In, a good rugby term.  The Americans changed it to Operation Tweet.  The Russians merely called it Operation Trump Card.  The US President tweeted how "clever" the Russians were, and how the Russian forces would put the efforts of the US, French and British armies to shame.

We are playing a Malikastan mission this Wednesday.  And, maybe Brisbane will play the other pincer.  The Russian pincer will involve the attempt to capture a hill overlooking Hotaki City, upon which sits a World Heritage ruin of the pre-Hotaki era.  During the capture of the ruin by the Hotakistanis they had been destroying portions of the ruins to bait the west in attacking the city and thereby bringing about the beginning of the Final Days.

For the last two days the Russians have been fighting through the IEDs and fortified positions to get to the base of the hill.  Their first assault on the hill was repulsed with heavy casualties.  They have now brought up heavy self-propelled artillery to "gently" remove resistance so from the ridge line so that their VDV (paratroopers) can gain a foothold on the hill.


Victory Points
Malikastani Terror Brigade & Hotakistani Regulars
+2 VP for each time the Russian player fires the 155mm at a position on the hill
+1 VP per Russian KIA or Seriously Wounded
+5VP per Russian Vehicle destroyed

Russian VDV (Paratroopers)
+5VP if the Russians hold the ridge line at game end or beyond
+5VP if the Russians have advanced to the edge of the board
+1VP for each MTB or HR fire team/crew destroyed.

+5VP for each armoured vehicle of the HR destroyed

Turns: 7
Russians start with initiative and automatically hold initiative for turn 1 and 2.
From the beginning of turn 3 roll for initiative as normal
Conditions: Clear.  At the beginning of each turn roll a D6, on a 4+ a wind picks up (see Dust special rule).  Roll a direction dice and a wind speed.  At the beginning of each turn reroll the wind speed dice.
Play Area: 4'x4'

Russian Paratrooper (VDV) (INI10, TC8, MOR10)
Full VDV Platoon (minus the weapons support section)
One 2S23 Nona w\120mm
One Tunguska
One 2S19 MTSA 155mm
One T-72 arrives at the beginning of Turn 3.

Malikastani Terror Brigade (INI D6, TC D6, MOR D12) REGULAR
Team 1 Leader w\AK, 3 w\AK, 1 w\RPG (AP3/AT3M), 1 Suicide Bomber (AP3/AT3L)
Team 2 Leader w\AK, 3 w\AK, 1 w\RPG (AP3/AT3M), 1 Suicide Bomber (AP3/AT3L)
Bunker (3 crew) with DShKa HMG (5D10)
VBIED (Sedan, Uparmoured Soft, FA2D6, SA2D6, RA1D6 AP6/AT2M)
AT Minefield (AP-/AT4D8H)
AP Minefield (AP4D8/AT1D8L)
Two IED (AP4D8/AT2D8M)

Hotakistani Remnant Armoured Brigade (INI D6, TC D8, MOR D8) REGULAR
Two T-55

Special Rules
DUST.  Place a dust cloud behind any vehicle that has moved.  Place a dust cloud in front of any 100mm gun or larger that fires.  Dust blocks LOS until it dissipates or moves.  Place a large dust cloud at the location where the 155mm shell explodes.  At the beginning of each turn roll a D6 for each dust cloud, on a 4+ it dissipates, otherwise it moves on the wind.
Medical.  The Russians have normal medical,  Malikastani/Hotakistani have Caveman Evacuation.
Prepared positions and ratlines.  The Malikastani/Hotakistani forces have well-prepared positions,
Mines.  The Malikastani/Hotakistani player may place three minefields, one of which is fake, one of which is AT and one of which is AP.  Any unit moving in a minefield will trigger a mine on a failed TC.
Remote Detonated IED.  The Malikastani player also places two IED anywhere in the 2/3 of the board away from the Russian edge.  The crew of the bunker must
Explosive Rule: All blasts have a diameter equal to their number of AP dice.
Loaded: The Russians are carrying unlimited supplies of RPG.

Tuesday, 6 December 2016

Mission Briefing: Force on Force on 40K Ridge

Far far in the future, in a galaxy we inhabit, a unit of Planetary militia are ordered to clear a nameless ridge 40km's outside of the human settlement of Neuamazonia.
The six Chaos survivors
Five days ago a raid of Chaos Warriors hit the Neuamazonia colony, after four days of bitter fighting they were destroyed.  At a huge cost in human lives.  Earlier on this day a final message was received from one of the Neuamazonia milita patrols, they had found the last surviving raiders.  The message was cut-short, and a drone showed a destroyed convoy on the 40KM ridge.

On the ridge are six men of the chaotic Donusa.  Contorted by the chaos of hyperspace these half-men have no hope.  There will be no reinforcements.  There will be no rescue.  They will die.  Their Lord, Donusa, will not come.  But, in their last fight they have the opportunity to take many humans with them.  

Down below the ridge a planetary militia platoon of 24 men and women with their last surviving armoured car have surrounded the ridge.  The battle of 40K Ridge has begun.

This is a 28mm version of Tomorrow's War Scenario 2 on Page 227.  Still painting my 28mm WW2, so we will use some GW miniatures.  See the mission in the book for terrain and the map.

Game Length: Game ends when all Donusa's Chaos Warriors are casualties or prisoners
Initiative: Chaos Warriors for first 2 turns, then test.
Fog of War: Use normal cards.

Don'usa Chaos Warriors
VP: 1pt per turn, after the 1st turn here Chaos Warriors are still combat effective.
Confidence: High
Supply: Normal
Overall Tech Level: 3 (+1D on attacks vs. enemy infantry)
Body Armor: Power Armour TL2 (+3D), can self medicate, double optimum range, intimidating (all attacks by this unit on other infantry are intimidating, make a Morale Check)
INI8/TQ8/MOR10
Special Rule: If they are being captured make a TQ, on success suicide with a 3D Firepoer blast.

GROUP 1:
x2 Chaos Warriors (+1 weapon each)

GROUP 2: 
x2 Chaos Warrior (+1 weapon each)

GROUP3:
x1 Chaos Warrior (+1 weapon each + AP4/AT4(H)) - Can attack with both weapons
x1 Chaos Warrior (+1 weapon each)

Neuamazonia Planeterary Militia
The Neuamazonia Militia
VP:
1VP Per Chaos Warrior Killed/SW
5VP Per Chaos Warrior  Killed/SW before end of Turn 3
3VP If all Chaos Warrior killled/SW before end of Turn 5
3VP per Chaos Warrior POW

Confidence: High
Supply: Normal
Overall Tech Level: 2
Body Armour: TL2 +2D
INI8/TQ8/MOR10

Fireteam 1A (setup within 4" of West Edge)
Fireteam 1B (setup within 4" of West Edge)
Fireteam 2A (setup within 4" of South Edge)
Fireteam 2B (setup within 4" of South Edge)
Fireteam 3A  (setup within 4" of East Edge)
Fireteam 3B (setup within 4" of East Edge)

Each fireteam is:
x2 w\Volley Gun (Gauss)
x1 w\ Plasma Gun (+1)
x1 w\ SAW (+1)

The Neuamazonia Armoured Car
Armoured Car (TL2) (setup within 4" of North Edge)
Weapon TL2 (-1 vs. Chaos Warriors)
Armour TL3
FA 3D10
SA 2D10
RA 2D8
DA 1D6
Main Gun Rotary Laser Gun (AP4/AT2)
Secondary Weapon Gauss LMG (AP4/AT0) (ignore 1 cover or 1 armor dice)
Crew 3
Lifesaver (+1 on Crew Survival Checks)
Improved MG (included)
Safe Haven (+1 on Bail Out Checks)

Saturday, 6 September 2014

Mission Briefing: The Rescue

The UN was a tad optimistic with their estimation of how rapid their advance would be.  They heralded the liberation of the Mithraist's in Ghani Bayt on the news channels of the world.  Unfortunately, they became bogged down in their advance.  Unfortunately, the Mithraists swarmed into the streets celebrating their liberation.  Unfortunately, the Woz Insurgents were in the vicinity.

So, the UN has thrown together a British flying column with orders to rescue two dozen Mithra men trapped in the Mosque and communal Grape Drying building in Ghani Bayt.  The Woz insurgents are intent on exterminating the last of this long diminished sect in Hotakistan.

The UN know that the Hotaki Woz are 2-3 dozen, and are likely to have IEDs.  The Woz have intelligence that are Mechanized Infantry platoon is approaching the town.

Map Overview
The mission has a "blind" aspect to it, with regards to forces and objectives.  So each side should not look at the map of the other side.


IF YOU ARE THE WOZ PLAYER LOOK AT THIS MAP


IF YOU ARE THE UN PLAYER LOOK AT THIS MAP


Saturday, 22 March 2014

MISSION BRIEFING: Operation Democritus

Something Russian
Something United Nations
Something Hotakistani
Something Geiger
And a Holy Hand-grenade in her undercarriage


Malika City Airfield (LV-426) – Camp Acheron
Camp Acheron, once the model of what a UN base should be, was shattered and tense.  Russian paratroopers had landed without warning earlier in the week and had secured the eastern edge of the airport and sent flying columns into Malika City.  The UN wanted to start the construction of a refugee camp at the east edge of the airstrip.  The Russian duma had said they would not move, but a confrontation between the Russians and UN was averted when the Russian commander on the ground agreed to move to the north edge of the base saying, "We will move commander, we are not some out of time fascist bully boy who just takes what he wants."  With that the Russians moved to the north.

Early in the morning General Phil Graves was woken by his adjutant: the Russians had moved en masse from their allotted position in Camp Acheron to the MMW.  The lieutenant said the Russians were heading for the partially abandoned Main Maintenance Workshops on the western edge of the base.  A general alarm was sounded, General Phil Graves ordered his subordinates to put together a force from the many remnant UN units to intercept the Russians and stop them from reaching the MMW.  The rules of engagement: Fire if fired upon, but firmly stop the Russians move.  While the order group was still underway small arms fire erupted from the helipads to the east of the HQ.  General Phil Graves ordered his radioman to contact the guard HQ, but the radioman shook his head handing the receiver to the General, the general put it to his ear, all he could hear was rapid chirping sounds.  General Graves turned red, "The fnckiug Rnssiaus are jammiug ns!"

Earlier, two Hotakistani observers, secreted away in in the MMW spotted two men searching through the wreckage of the planes in the MMW.  The two Hotakistani's stealthy moved closer to the two men.  The men were Russians and were using a scintillometer.  Both the Russians and Hotakistanis dove for cover as a French Peugeot patrol vehicle drove past.  After the vehicle had passed the Hotakistanis could no longer see the Russians.  The Hotakistanis scouts fell back to their hide and radioed for support.  In the dark the two Russians sent an important message to their HQ in Russia.

The MMW includes several wrecked aircraft, including the jetliner which crashed at Malika City Airport on the first day of the Hotakistani Invasion (see LINK)

In the early light of dawn the conflict starts.

MISSION: 10 Turns
INITIATIVE: Russians start with initiative.  From turn 2 roll for initiative as normal.
VICTORY POINTS: See individual briefings for bonus VP, otherwise 2VP per KIA and 1VP per SW.

FORCES:
Russian VDV Paratroopers (INI10, TQ8, MOR10) 
UN Nations motley strengthened Platoon (INI8, TQ8, INI8) -1 INI dice (poor command) +1FP (good supplies)
Hotakistani Paratrooper Platoon (INI6, TQ8, MOR12) -1FP (low supplies)
NSA Agents (INI10, TQ10, MOR12)


Note to players: Only open the secret order link that has your initials next to it.
NSA LINK (ULTRA SECRET ACCESS IS DENIED, otherwise please contact Snowedin or Wikidrips)

The units from each force can be seen here.  Only look at your force!
RUSSIAN FORCE (BC)
UN FORCE (SF)
HOTAKISTANI FORCE (MM)
NSA FORCE (KP) (revealed for all by Snowedin!)

On turn 3 the UN commander receives this hand-written communique:
LINK (SF only on turn 3)

Special Mission Rules:
1) MMW – The workshop contain dozens of vehicles in various states of disrepair, a team using tactical movement may attempt to commandeer the vehicle on a successful TQ check (all sides suffer a -1DShift except for the UN force).  Only a vehicles secondary armaments can be used on commandeered vehicles, the primary armaments are not functional.  A non-successful commandeer results in the vehicle being classed a non-runner by all forces for the rest of the mission.
2) No side has access to artillery, reinforcements or air support
3) Initiative, only one side has initiative per turn.
4) Concrete buildings are +2D, warehouse is +1D, all internal are +1D.  All buildings are 4D10 STR.  The aircraft give a +1D
5) All doorways and gateways are considered closed and all windows locked.  To enter the unit must pass a breaching TQ +1DShift.
6) The aircraft can only be entered by passing a breach TQ.

The Russians must also capture a helicopter.  The helicopter is guarded by four UN soldiers.

RECON IMAGES
RECON IMAGE 1

RECON IMAGE 2

Saturday, 15 March 2014

MISSION: Beatrix Potter and the modern insurgency

After reading the news of the ongoing war between the British and the cunning insurgent Badgers in the UK we thought it was time to bring it to the table.  It seems the badgers have outwitted the British government (cunning little critters!) and their farmer allies.  Obviously the best approach is to turn to Beatrix Potter to design the mission.  She documented the war long before the government became involved.  I refer to the "Tail of Mr. Tod".

And thus the battle between the Hotakistani "The Badgers" Brigade and the British "Desert Rabbits" came to be.  Will the captured Rabbits be saved?


The Lost Tail of Mr Tommy (AKA The tale of Mr. Tod)
 
Note, it would be better not to show this map to the Hotakistani player, and therefore the flank move would be a surprise and not effect the setup.
Location: Batraks-Pota, Western Malikastan.
During the battles between the British “Desert Rabbits” infantry and Hotakistani “Badger” Mechanized Infantry Brigade the Hotakistani’s captured a dozen soldiers in the British convoys “tail”.  A few days later a local resident arrived at the British HQ of Lieutenant Brock, “Mister Tommy, I have grave news to give to you, the Hotakistani commander Tawd Ibn Oni has held a court and found the Tommies guilty of warcrimes and they will be shot at dawn.”

Brock has decided to launch a rescue mission to rescue the lost “Rabbits”.  The French commander, Lieutenant Renard, said he would attack the “The Badgers” as a diversion.
Early in the morning the Hotakistani pickets warned of an attack, Lieutentan Tawd Ibn Oni ordered his BMPs of “The Badgers” TB-1, TB-2 and TB-3 forward.  The morning quiet was broken by the BMPs coughing to life.  They soon engaged the French from across the dry river bed.

British Mission: The British Desert Rabbits will flank the Hotakistani “Badgers” Brigade units once they are engaged by the French Vulpes combat groupe.
Hotakistani Mission: Disengage from the firefight with the French, stop the Tommy’s from rescuing the captured “Desert Rabbits”.

The Hotakistani setup engaged with the French (offboard units), the prisoners are defended by a small force, the British arrive in a flanking move.  The Hotakistani’s must disengage to stop the British from rescuing the prisoners, or attempt to kill the prisoners.
French Offboard Units

Sniper Weapons Team (2), 300m Team (3 men with, two with single shot AT-4CS (AT3/AP3(H), VAB with 20mm, Eryx Weapons Team (2) (AP4/AT4(H)), two 600m teams (3 men with +1 SAW, +1 UGL).  French units are removed if they fall of overwatch or suffer a casualty.  All French Infantry have +1D armour and +2D (In cover and cover).  French infantry units must always successfully spot the target, even if it moves, and lose 1D from their FP.


Turns: 7 (or 8?)
Hotakistanis Front-line “The Badgers”, TQ8/MOR8, Mechanised BMP infantry platoon – Section (but 3 BMP
Hotakistanis Guards, TQ8/MOR8, four single AK (each as a single man unit).  To guards are setup with the eight prisoners (hidden), and two are setup at least six inches away from the prisoners.  All must be setup in or on one of the five buildings.
British “Desert Rabbits” TQ8/MOR10 (Infantry platoon – 1 section), enter either on the north or south side.  Must exit, either on either edge with the prisoners.  British have  3 AT-3 and one fire team with “infinite” LAW AT2/AP2(H) on a TQ.
VP: If more prisoners are exited than on the board the British win.
1)The offboard French have overwatch even if the UN does not have initiative.  All French units are automatically on overwatch.  If they fall off overwatch they are removed from play.
2)On a TQ each guard within an inch of a prisoner can execute a British prisoner, but only after the guards have spotted at least 5 British soldiers from the Desert Rabbits.

Counters to be used for the French offboard units.  The Eryx only has two shots.

Sunday, 9 February 2014

AAR - The fight for Pavdullah's House

General Phil Graves looked at the weeks statistics for a second time, his casualty rate had decreased, and the UN’s rate was up.  This was not good, his troops were obviously not trying hard enough.  When he looked across the concrete runway to the Australian infantry readying their equipment he decided that they would immediately attack into the city.
 
The layout
Pavdullah sat on the top storey of "his house" looking westward to the beleaguered legations, he smiled, this was a perfect spot from which he could call down the 220mm rockets.  Before Pavdullah moved in, the building had been the “Malikastan-United Nations Youth League Outreach School for Transition”.  After Pavdullah kicked out the teachers the building became known as Pavdullah’s House.  The AUStralian-USA Force (AUSAF) also saw that the MUNYLOST building had unobstructed views to the last legations and too the airport itself.  The building had to be taken at all costs.

The Australian Lieutenant, Winston Hines, received his orders with incredulity, he was still waiting for his last ASLAVs to land.  He saw a group of South African mechanics repairing a bunch of “past best by date” Ratels, and asked to borrow a few.   Corporal H. Owzit agreed as long as he could join the Aussies in their attack.  The mechanics told Australian Lt Winston Hines and Sergeant Allan Lot that they also had found a British Challenger tank in a hangar and would bring that along for good measure. 

Thus it was that the Battle for Pavdullah’s House came to be.

The mission:
Australian Mechanised Infantry (8-10) + 4 Ratel/ASLAV
US ODA Team (10-10)
+Medic
+1FP for ODA
+155mm Artillery
+Apache Gunship
+1 Section of South African Infantry
(Reaction Card during game: +1 Challenger/Abrams Tank)

HVT Insurgents (8-10 regular)
Hardened Insurgents (8-10 regular) included one random T-55.
+Quad 14.5mm AA
+220mm Rocket Artillery
+RPG Team (AP3/AT3(H))
 
The entire mission plan.  
Pavdullah’s house was defended by a hardened insurgent platoon, with more allies on the way.  In a nearby warehouse the insurgents were rebuilding a T-55 that the Russians had damaged a few days earlier.  The insurgents were disastrously short of RPGs, but they did have a quad 14.5mm AA gun to keep the sky clear.  Pavdullah’s house was a monster of a building with thick concrete walls, and appeared to be more of a prison than a school.

The ODA team in Malika City heard that the Aussies (with a bunch of South African mechanics) were about to take on Pavdullah’s House and therefore thought it best if they came and showed the Aussies how to do it.   Pavdullah’s brother phoned Pavdullah and told him they had spotted the Australians advancing towards his position.  Pavdullah replied, “Not to worry, brother, I have just unwrapped a new state of the art RPG, let them come.”
 
Insurgent hunker down as the two Ratel's fire on the warehouse.
The attack started with the Australians infiltrating into the ruined buildings to the north of Pavdullah’s house.  The ODA joined this advance and also moved with two Ratel’s and a Australian GPMG team to take the ruin to the south of the “House.”  Some insurgents were spotted and engaged.  The Apache helicopter failed to arrive at first, but a 155mm stonk wounded several Hotakistani’s in the trenches to the south of the “House”.
 
The four 155mm shells land, causing casualties in the trenches and dropping the roof of Pavdullah's house onto the insurgents on the top storey.
The last section of Australians, a section of South Africans and the borrowed Challenger tank flanked the house and attacked the large factory warehouse from the south.  Though the Challenger would arrive late.  The T-55 in the warehouse burst through the massive roller doors only to have its gun shots away by one of the Ratel’s.  Amazingly in the wild melee to come the T-55 would survive to fight another day.

The insurgents in the thinly clad warehouse survived immense fire from the Ratel’s and ASLAV-25s though the building began to take on a Swiss cheese appearance.  Both sides refrained from further artillery as now the forces were only yards apart.  The insurgents proved very resilient to the fire and caused a few deaths amongst the AUSAF attackers, but eventually they started to accumulate wounds.

Two of the Ratel/ASLAVs were destroyed, one by the Quad 14.5mm and one by an RPG.
The Apache using Chin Sniping on the insurgents in Pavdullah's house.
The Apache eventually arrived, but failed to cause much damage.  The T-55 had retreated into the large warehouse, but eventually lost patience and charged through the remaining door and shot down the Australians beyond the door.  In the mad melee of men and machine the South African and Australians anti-tank men could not get a clear shot at the T-55.  With dozens of insurgents in the warehouse complex, gently caressing their Molotov Cocktails, the Challenger crew decided discretion was the right choice and remained in an overwatch position.

Eventually the Australians charged across the street between the ruins and Pavdullah’s House, finding the road covered with mines, but miraculously they all survived.
 
The Australians stack up for their assault on Pavdullah's House.  The glory boy ODA also approach the east wall to breach and clear.
It was by this time that Pavdullah gave his turban to his 2nd in command and slipped out of his house via the tunnel to the warehouse, he quickly ordered two teams of insurgents into the tunnel and told them to hold the house to the last man.  He then slipped away east to fight another day.  The insurgency could not afford to lose such an important man.
 
The Fickle Finger of Fate brushing off the Apache's second attack (presquished)
Two teams of Australians and the two ODA teams now stormed the “House” and in hand-to-hand combat dispatched the defenders on the first and second storey’s.  They also went into the basement to ambush anyone arriving by the tunnel.  The first insurgents to attempt entering the basement fell back under fire, and the second team decided they would “live to fight another day”.  The insurgents on the roof made a last, but futile, attempt to rouse the invaders from their building, but were killed.
 
The final insurgent assault is destroyed by the ODA team on the second storey.
Result: AUSAF Victory (3 floors in AUSAF hands vs. 2 in insurgent hands)

No one likes Stalingrad.  This was an obvious remake of the famous Pavlov’s House in Stalingrad.  It takes guts to attack such a structure, and guts to stand against an overwhelming force.

I only played the beginning, so much of the rest was observed from playing Pulp Alley at a nearby table.  I believe they say that the first casualty of war is Truth, and this may be true with this write up.

The mission was very basic in design, a map, a few rules for the buildings and the rest is history.  A two-legged dog?  Likely, but everyone loves Stalingrad…

While waiting for Eureka Miniatures, we substituted US for Australians, and used Ratels for the ASLAV-25s (I need to paint my ASLAVs!).

With the rampant defeatism circulating the ranks I think the following are a few wise words.

And Tolstoy had it right, "A battle is won by the side that is absolutely determined to win. Why did we lose the battle of Austerlitz? Our casualties were about the same as those of the French, but we had told ourselves early in the day that the battle was lost, so it was lost.” 

And Ho Chi Minh comes to mind, "We don't need to win military victories, we only need to hit them until they give up and get out."

Friday, 24 January 2014

Mission Briefing: The Ride of Debt, War, Battle, Shaker, Wand-wielder and Spear-shaker

Mission Briefing: The Ride of Debt, War, Battle, Shaker, Wand-wielder and Spear-shaker (v2)

Well, Ride of the Valkyries was already used ... here be the mission for this weekend.  As usual it could be as balanced as a two-legged dog...but when you are riding with the six Valkyrie babes, who cares.

To the east the British armour and mechanized infantry at the Azmakassar Ford have escaped being overrun by Malikastani’s and insurgents.  They are now heading at speed towards Patrol Base 55, around the south of Azmakassar.  The Hotakistani commander infuriated that the British slipped past the useless Malikastanis has sent two infantry platoons to block the retreating convoys path.  From the FOB, a Uruguayan UN platoon, bolstered by artillery and a US ODA team, rushes eastward to keep open the fast closing trap.

The Challenger tanks Debt and War each lead a convoy of Warriors and soft-skinned support vehicles (the Warrior’s are named Battle, Shaker, Wand-wielder and Spear-shaker.

The mission starts with the Uruguayan infantry infiltrating into the house each side of the Azmakassar road and the convoys heading westward.  The first convoy decided it would be safer to go the slower route across the fields, while the second convoy decided the safer route would be across the bridge and down the main road.
The Map v2 (added a ford between the bridges, 2' from the western edge, this should allow a little more flexibility in the mission.

The Legend...well just Legend really

Convoy 1: Setup on road and must use the road as first route option.  Convoy consists of a Challenger, Warriors x2, Soft-skin x1, Squad x2.
Convoy 2: Setup off the road and must use the fields as its first route option.  Convoy consists of a Challenger, Warriors x1, Soft-skin x2, Squad x1.
Convoy Rules: Convoy vehicles main guns are out of ammo, their MGs are still at full strength.  Convoy vehicles may only move as a convoy (except when scattered) and will react to fire.  Even if a vehicle reacts to fire it may still move as a convoy.  Vehicles still have smoke.  When a Medium or Heavy vehicle in the convoy is destroyed/immobilised in a fireball the convoy makes a TQ, if it fails the convoy scatters, each vehicle moves D6” from its present direction in a random direction.  In the next convoy move the vehicles must first regroup and then use remaining movement to continue moving.  A convoy only moves when each unit is within 2” of each other (front to rear).  Once a convoy loses a vehicle it may break from its predesignated path by passing a TQ.
Reinforcements: Both sides draw 4 reinforcements cards from a double set of reinforcements cards.  So in the end it will be 43 reinforcements, assigning a D8, D10, D12 and D20.  All reinforcements must enter from offboard by passing a TQ 4+.  UN reinforcements may enter on the Exit, Entry or SF entries.  Hotakistanis enter using the normal dice method for this mission.

Turns: 10+1(D6 4+)
Initiative: Hotakistani for turn 1, roll for initiative from turn 2.  Convoy vehicles do not count towards initiative dice.  Convoy moves at the end of the turn, no matter the initiative order.

Units:
Uruguayans (use full US Platoon) TQ8/MOR8/INI8 Fatigue 5+ (one squad must pass TQ to enter)
ODA (two 6 man teams, with JTAC) TQ10/MOR10/INI12 Fatigue 4+ (each team only enters on passing TQ)
Support: UN Medium Artillery Battery 1+
Support: UN Light Artillery Battery Fatigue 1+

Hotakistani Infantry Platoon 1 TQ8/MOR8/INI6 Fatigue 2+ (one squad must pass TQ to enter)
Hotakistani Infantry Platoon 2 TQ8/MOR8/INI6 Fatigue 2+ (each squad must pass TQ to enter, and enter from Turn 2)
Support: Medium Rocket Battery 1 2+
Support: Medium Rocket Battery 2 3+
 
The organization of the Hotakistanis (sans M113)
Turn 0: Uruguayans/ ½ reinforcement’s setup in their zone (blue area).  Roll Fatigue on one squad, a failed TQ results in that squad being delayed and enters on road on a TQ from Turn 2 onwards.
Turn 1: First Hotakistani platoon and reinforcements arrive using a D8 to find the location for each squad/vehicle.  On a D6 4+ the UN player can select the colour (green or red), otherwise the Hotakistani players decides.  Roll Fatigue on one squad, that squad is delayed until the following turn and only enters on a TQ.  Hotakistani forces may choose to delay entry until Turn 4 (see Turn 4) and then use a D10 to roll entry.  Hotakistani's enter within 6" of the location point, and must be more than 4" from a UN unit.  If they cannot enter they reroll, the UN does not control the colour on the reroll.
Turn 2: SF arrive at two possible locations (roll fatigue or be delayed on one fire team).  2nd Hotakistani Platoon arrive using a D6 to find the location. Hotakistanis may choose to delay until Turn 4.  Roll Fatigue on one squad, that squad is delayed until the following turn and only enters on a TQ.
Turn 4: Delayed Hotakistanis may use a D10 to find entry and ignore colour rule.

VP: Casualties count as normal.  Convoy vehicles and crew are not considered towards VP, but are multipliers to the VP.  For each convoy vehicle and convoy infantry squad exited gives a multiplier to the UN.  For each convoy vehicle destroyed/immobilized or remaining on board at the end of Turn 10 give the Hotakistanis a VP multiplier (there is a total of 11 convoy units):
               Two Convoy Units: x1.25
               Four Convoy Units: x1.5
               Six Convoy Units: x1.75
               Eight Convoy Units: x2