Showing posts with label Kabir Campaign Rules. Show all posts

Saturday, 28 June 2014

2017 - The Age of the Robot begins

Following the incident at the Malika City airport, where the NSA experiment with rabid dogs went awry (read about the sordid affair here: REDACTED), the UN has sought alternative means to add to the security of their forces (other than equipping their forces with fire extinguishers).
Wikidrips grainy image of the NSA Rabid Dogs attacking Russian Paratroopers.
Though the first 'bots were used during the eradication of the Bu'hu Nah'harem terror-slavers in west Africa in 2016 the first effective use of bots occurred in the Western Malikastan Pacification during the United Nations and International Intervention force actions following the Hotakistan-Riali war.

Should the UGV be Soft or Light, or indeed a vehicle or Gun?
The first unit was landed at the main airbase in eastern Western Malikastan, the base soon to be renamed after the fallen UN hero Heidi Clare.

Semi-Autonomous UGV Rules to consider
The rules governing robots follow the Tomorrow's War rules with the following amendments:
1) The drones can be used as as single unit or divided up between teams in another platoon.  In the campaign UGV platoons can be dismantled and divided between units.
2) Drones can be controlled by a team it is attached to and thereby uses that teams TQ, and it can be set to be interdependently on overwatch (as per the TW rule on page 146).
3) Drones can be remotely controlled, but at the beginning of each turn roll a D8 TQ, if the roll fails the drone goes into semi-autonomous mode, TQ6 and does not move, but will still engage hostile forces.  If the force includes a UAV then the failed TQ can be rerolled.
4) Drones receive a -1 to Reaction tests as per the TW rules, but also receive a further -1 Reaction when engaging any target within 8" of the drone.  Drones receive a +1drm on spotting checks beyond 8".
5) Drones have an infinite optimum range as per TW rules.
6) UGV drones may not climb stairs or pass over walls.  When a UGV drone crosses a ditch or water feature it my pass two TQ to enter and exit.  A UGV can be man-handled over walls and upstairs, but cause the unit to be considered rapid moving even though it is limited to tactical move distance.
7) UGV are generally armed with double HMG and count as a superior HMG, AP4/AT1(L) and do not suffer from Rapid Move modifiers, nor do they ever fall off overwatch.
8) Whenever a UGV rolls a 1 on a reaction test or bog test it is removed from play.
9) Drones may not fire at a target if the LOF passes within 2" of a friendly unit (not including the team it is attached to).

Ground Zero Games has a nice selection of UGV:
GZG Drones and especially this little one which I think I will be getting.

Drones can be attached as "wingmen" to vehicles and can move with the vehicle adding to the vehicles security.

Worth the rules?  Or simplify.  I like the TW Overwatch rule, adds nicely to tactical options.


Friday, 20 June 2014

Card or Not to Card?

During the Escalation campaign I pondered on how to give more "order" to the irregulars.  In many accounts of insurgent fights the insurgent forces are not poorly organized as a random roll on a table would make us believe.  So I propose a system that can both incorporate some, lots or no order (depending on hand size).

So, how about this, a Reinforcement Card Deck and a Hand of 3-6 cards.

How this would work, say you are leading a force which has a Deck Hand of 6, you draw six cards on turn 1, you play 1, discard 1 unused and keep 4.  On turn 2 you draw two new cards, and then decide which of the cards you will keep, play and which you will discard.  This will give an element of control over which forces will arrive and when they will arrive. But, you still do not know exactly what your whole force will turn out to be.  The advantage of this system is it is easy to add thematic cards, and is easy to add a whole gamut of reinforcements types, and with the number of cards one can control the frequency of particular reinforcements.

Here is an example, I have a hand of four cards, I will draw two more and then from my new hand of six I must play one and throw away one.  Special events may allow you to play more than one card.
My Reinforcement Card Hand
So, for example say I draw these two cards:
I like the commandos' so I decide to keep them, but I do not want to use them yet, I do not see much opportunity of bringing down artillery so I discard the Rocket Battery card.  One of my hotspots is close to be overrun so I decide I will play the Leader which gives me the opportunity to move a hotspot.  

We can setup the cards that the insurgent player gets to play 1 or 2 card per turn.

So, is this too complex?  Do you prefer tables?  Does this add too many cards to the table?  Does this add more strategy for the insurgent player?

Another nice advantage of this system is that the insurgent player will want to accumulate good cards for when they are best played.  But, if the regular players has interdiction or reserve units the regular player may attempt to remove either a random card from the deck or may with say a UAV inspect the deck and select are card to discard...on a successful TQ.

If you like/dislike this idea, how about a slightly different one, you have a small deck of Morale, TQ and INI cards, you can draw two cards from one deck and one each from the others (or even 3, 2 and 1).  From the two card selection you get to select one of them to represent your force.  The other two single draws you get what you get.  So if you feel you want to go for a better morale you can decide to select two Morale cards and keep the one you like.

Here are four examples of some TQ cards.  Each player gets to draw their own, so if there are two insurgent players each gets to "create" there own forces INI, TQ and MOR.
And here are examples of INI and MOR.  You will not each can come with a Special Attribute and Hand Size for Reinforcement cards.  This will allow flavor to be added in a very simple manner.
So what do you think?  Like/Dislike?

Falling asleep in the early evening or watching TV...and falling asleep... has not helped this week in getting the campaign done, but the setup for the campaign is coming along, I have added the initial insurgents, the elders, the militia and the retreating Hotakistani Forces.  You can see the Veteran units from the last portion of the campaign are chasing down the Hot's.  They are low on ammo and high on fatigue.  We can start the campaign whenever you want, the rest of the rules can be formulated as the regular conflict dies down.

Let slip the Dogs of Major D. Zaster!


Saturday, 14 June 2014

Lesson 7 - Why reserves matter

One issue I have often pondered in wargames is how to make it sensible that having a reserve is actually a good thing.  This lesson includes examples on why it is wise to have a reserve.  Apologies for this very wordy example, I started trying to make it all graphical, but somewhere along the way I lost that intention!  I was going to redo it...then I lost that intention too.  I realise these campaign rule postings are a tad boring, we will soon kick off with the campaign while we finish the design as the initial part of the campaign will be pursuing the retreating Hotakistani's rather than the insurgent campaign itself.

The two main lessons from this lesson is why you should have a reserve/QRF and two a general example on how you navigate the landscape and bring the enemy to the fight.  In this example you can see what all the influence-peddlers are, in the campaign many of these will be unknown, and will require effort on the players part to discover which of the influence peddlers are spoilers or helpers.

During this example I decided to drop MSCT (basically convoy protection) and made the QRF and PROTECTION activities.  Also I realized the need for a REST activity, for example, if the campaign commander wants his artillery to rest then it will not supply fire support, and therefore needs to be marked as such.  While I was at it I also added TAXI (to denote a unit as moving men and not taking part in the operation itself), and HUNT (for UAV and Special Forces).  Mentoring is also added, so when Malikastani units are created they will be...well crap...and you will need to instill some discipline and skill.  Therefore you need to designate a unit as mentoring.  A mentor unit can accompany a Malikastani unit on a patrol or operation.

So the command list is now BUILD, DIG-IN, MENTORING, ON THE MOVE, OPERATION, PATROL, PROTECTION, QRF, RESERVE, TAXI, VULNERABLE and the special HUNT.

I will have to make a graphic of all this.  But today I ended up playing SWTOR instead (after chasing Guinea Pigs around the garden!).

I will also upload all the slides so if anyone needs to translate them to read them.

The example follows a written order from a player, then shows what the GM does, then gives a brief note on reserves and then follows up with some examples of how the outcome of a mission is played.  Next post will likely be more around the generation of missions.


So, I think we have the following forces:
Brisbane:
Generic Middle/South Asian x2
US Infantry and Mechanized Infantry
British Infantry and Mechanized Infantry x2
Australian Motorised Infantry (Mech to come?)
Russian Infantry and Mechanized Infantry x2
Insurgents
British Armour
Russian Armour
Australian/US Armour

And in WA I have:
Generic Middle/South Asian
US Motorised Infantry (hopefully Bradleyize these soon)
French Mechanized Infantry
South African Mechanized Infantry
Australian Motorised Infantry to come (probably make a QRF force)
Various Armour (Australian/US/Russian)
Insurgents
Russian Paratroopers (with BMD)
I also know of one player north of me with British.

So these are the initial units in the campaign.  If anyone around Earth would like to join in and play some of the campaign battles please PM me and I will ensure that the module will include them.


Tuesday, 10 June 2014

Lesson 6: Fatigue, Replacements and Experience

We are now getting to the details of creating missions for FOF from the campaign events.  A core aspect of the campaign is Fatigue.

Units must manage their fatigue to remain effective.  As this is important I would like the players to review these three slides as they will be integral to how the campaign runs.

Fatigue is gained during actions and battles, and if a unit fails to get its upkeep.  Units lose fatigue through rest or through excessive upkeep.

Fatigue is important in missions, as it controls how effective the unit engages in the mission and how well it can extricate itself if defeated.

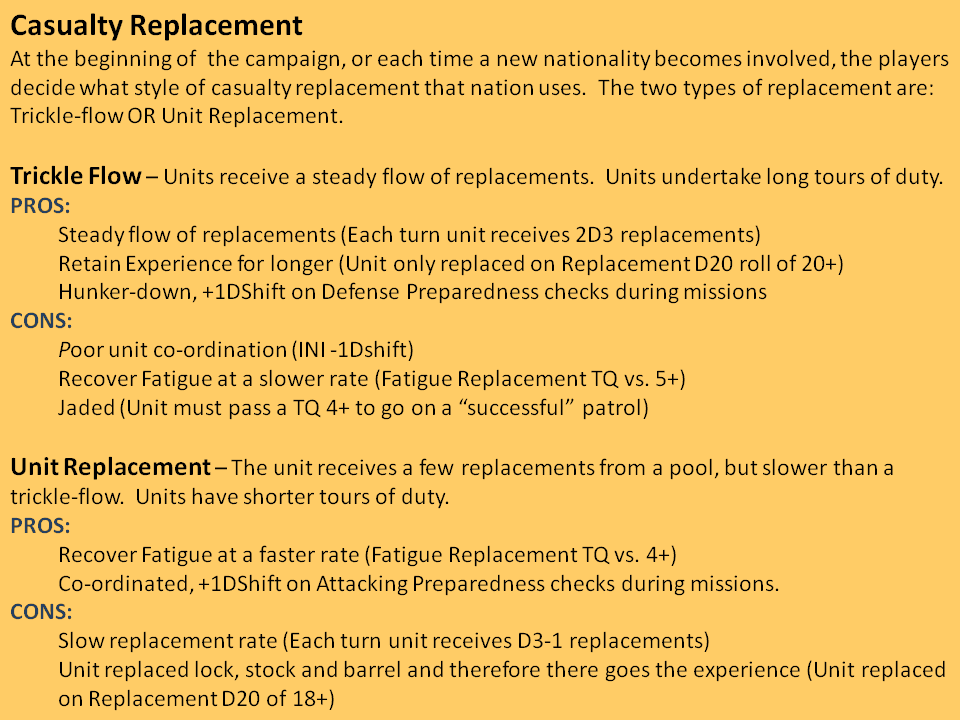
Now to the part we need to discuss, Replacements.  There are two options, a trickle-flow process and a unit replacement process.  Trickle-flow results in long tours of duty with a steady flow of replacements, Unit Replacement involve shorter tours of duty and slower casualty replacement.  Both have pros and cons.  Have a gander and send me any ideas.
In the Vassal Module press SHIFT-X to view the Experience Window
The FOF rules include a good system of experience, I think we use this system with a few changes to how you get the experience.  The counters in the VASSAL module now have an experience


A little boring I know, but important in connecting the campaign to the Force on Force missions.

Lesson 5: Of diluvians, plebs, opiates and collateral damage

Four disparate lessons.  Suffering an insurgency myself at the moment, damn viruses.  And bombing them with ineffective cold tablets seems to only annoy them.  Looks like the fighting season just started, it is hot and shaky.  Seeing a documentary on SBS where they said your cells are bacteria and the DNA that glues them together appears to be from viruses does not make me feel like I am welcoming home the prodigal virusson.  Enough of that, off to the campaign rules...

The campaigns motive is to enable the creation of Force on Force missions to be played within a framework of an insurgency.  There are no rules to stop you bombing the living crap out of an insurgent hiding in the house, there is no morals check you need to make, there is merely the risk of causing long-term harm in the campaign.  The campaign will hopefully give you pause when you are suffering casualties.  One of the original reasons for the campaign was also to get players to use an assortment of their miniatures.  As the GM I will modify as we go, as no playtesting is done, if it is a two-legged dog then welcome to the insurgency.  Should be hellish fun.

These lessons are more to the core of the campaign.  Players can learn the details if they want (and are wise or have read COIN history) or they can intuitively play the game.  Hopefully these rules will become intuitive during the campaign.

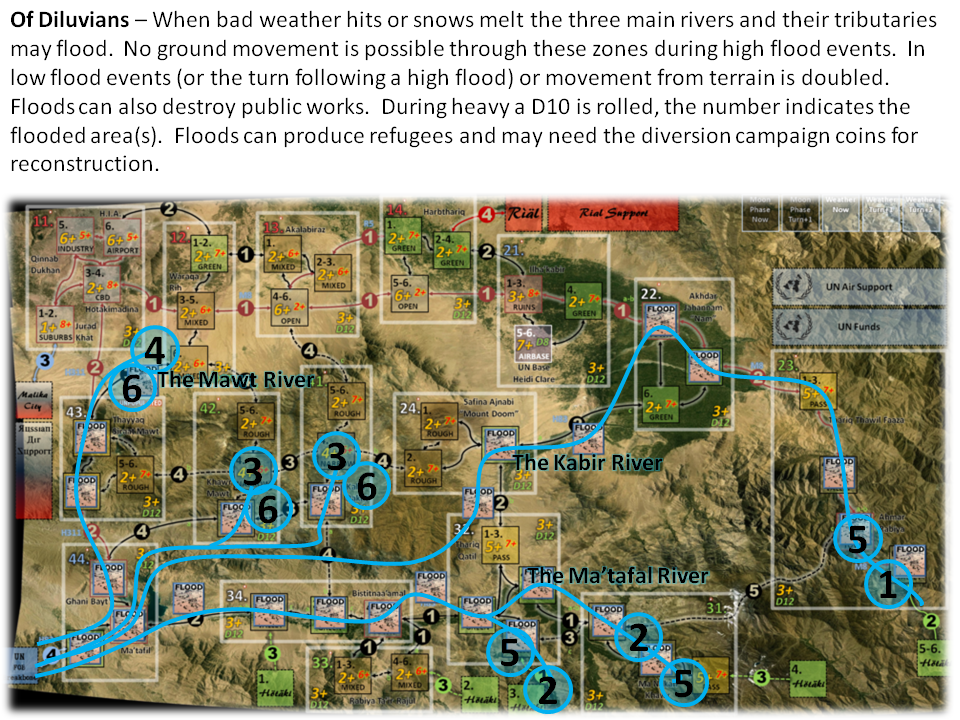
The first lesson is about Floods OR "How mother nature loves to screw you over".  With steep and narrow valleys leading onto wide and populated flood plains the risk of flooding is ever present.  Though if you are lucky this may never happen.  The first effect of a flood is to disrupt or hinder movement (during and directly after).  It also has the potential effect of destroying your public works.  Floods are restricted, and mostly affect the southern edge of the campaign area.
The level of flood is selected with a D10, this determines the dice type to use for the flood damage, a score of 1 to 6 is a D6, a score of 7 to 8 is a D8, a score of a 9-10 is a D10.  You then roll this dice for each campaign coin vs. 4+ and each base affected by the flood. You may also have to mount rescue missions, so say good-bye to those choppers just when you need them!  Flood Refugees are created by rolling a D4-D4, if that district is flooded then roll a D6, if the rolled area is flooded then place a refugee counter.

Lesson 2 - Opium.  The UN, Rialian and Russian strategic bombing campaign disrupted officialdom in Western Malikastan.  With alarming rapidity the corn fields across the southern areas turned red with poppies.  The Russians are determined to smash the druglords and farmers.  The UN is more circumspect, not wanting to piss off the dirt poor farmers.  Unfortunately, the farmers sell to druglords, and druglords are massive spoilers (i.e. do not want the return of the rule of law).  What is the solution?  I doubt there is one, mother nature has found another way to screw you with pretty flowers.  On each turn select one random poppy field and place a druglord using the district dice vs. district difficulty.  Any insurgent spoiler on a poppy field also can improve (+2 to +1 to 0 to -1 to -2) on a District Dice vs. District Difficulty.  During Poppy harvests the insurgents all become -3 to fight (so more difficult to bring to the fight).  Each time you attempt an operation in a poppy field you roll a TQ on a 4+ you destroy the field.  You then roll District Dice vs. District Difficulty to spawn an insurgent.  No one cares about druglords, so attacking druglords is one of the few things you can do without repercussions (unless the druglord happens to be the local governor...police chief or militia leader...or indeed a UN Commander!)
Lesson 3- The People - The reason you are here, or at least that is what you have been told.  You are here to save the people from a medieval existence.  You can toggle on a layer on the map to view the population and the population of each sect in an area.  For a variety of reasons these people can become refugees.
Lesson 4 - Collateral Damage and Refugees
Dropping large bombs or artillery strikes in a populated area may go wrong and kill innocents.  This damages you goodwill in the field and at home.


Well, that is some of the core inside the campaign.

Disclaimer: Any spelling or grammatical errors are there to annoy Mark, and therefore are on purpose.

Friday, 6 June 2014

Lesson 4 - Casualties, Support Elements and Activity

Well on to Lesson 4, not sure where this fits in Know Yours, I suppose it is still a Know Yourself.  How to deal with casualties, how to modify your forces through the addition of Support Elements, and what orders to give your units other than Move Here.  Also, includes a bit on how you can create a combat group like a QRF.  At the end is a introduction to one of the enemies, The Kalb, mountain tribesmen.  A tribe with the inclination to Shoot First and then Shoot Later.

So, first.  In each game the number of KIA and SW are removed from a units roster.  In a later lesson we will see how KIA and SW effect unit confidence and morale.  For now we will concentrate on how it is represented on the campaign counters.  Light Wounds?  Not sure if we just ignore light wounds.  I think so, or later in the campaign we can apply light wounds as temporarily lost to a reinforcement pool?  Your thoughts please.

Okay, onto the slides:


Tuesday, 3 June 2014

Kabir Campaign Lesson 3 - Know yourself

On to lesson 3 (these "Know yours" will be the rules for the campaign, making it simpler to read, so the introduction is also the rules).

This "Know Yours" is about your units in the campaign.  When a player's unit successfully engages an enemy unit the sections available on the platoon counter(s) are used in the mission.  Here is an introduction on how you read the campaign unit counters.
Two of the players advised me to Keep It Simple Stupid.  I failed!  But now an image of the battle from the  campaign map tells you which units are involved, how many sections and vehicles, the units Initiative, its Task Quality, its Morale, its fatigue level, it supply level and what integrated AA it may have.  So, failed KISS, but my life is easier, though it makes the counters look a tad complex.

A note on Fatigue.  In the last campaign the fatigue covered a combination of casualties and real fatigue.  So during missions it a TQ vs. Fatigue for a single section decided if it would be present in the game, and a second TQ vs. Fatigue decided if one or more units were suffered delayed entry.  In the new campaign it merely represents fatigue, so how units are delayed in a mission or how well prepared they are if defending.

The number of casualties are also recorded until the unit loses 8 men and then a whole section is removed.  The casualties are reviewed by pressing L and it will replace the fatigue number.


Sunday, 1 June 2014

Lesson 2 - Know your own terrain (and how you can build your own "cave")

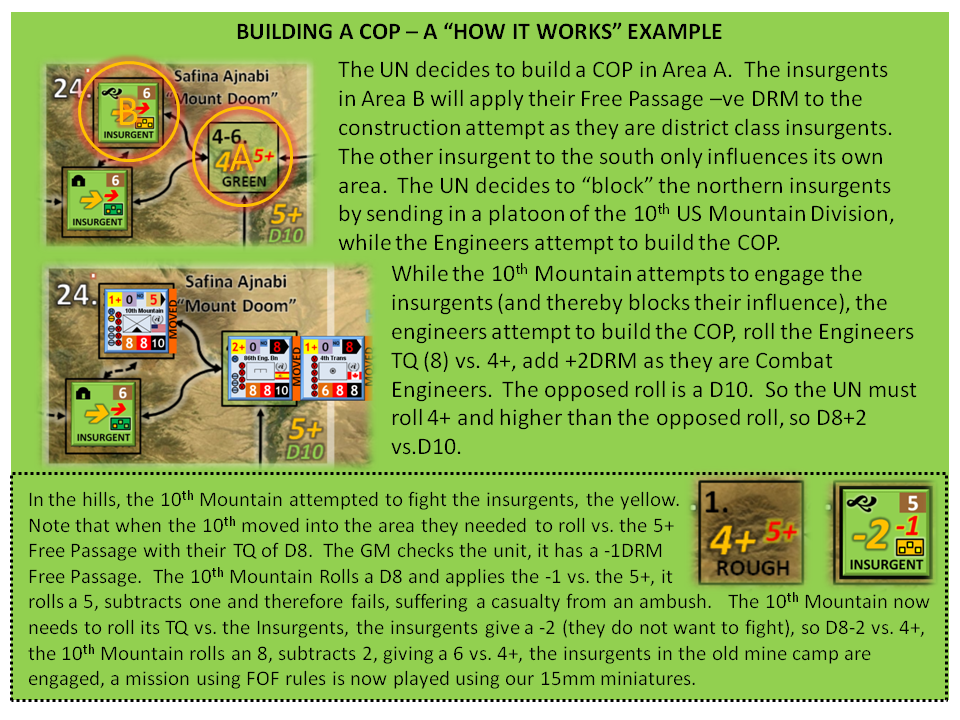
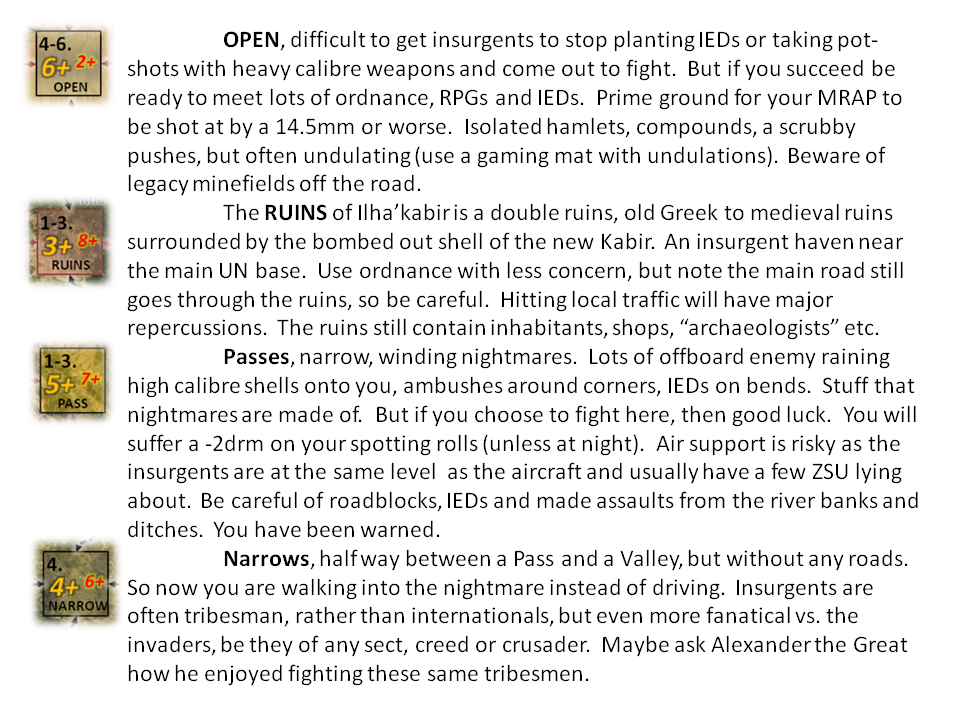
That took longer than expected!  Fighting VASSAL from my own ignorance!  Solved, and all the base types have now been added.  So, onto Lesson 2, Know your terrain.  The Kabir Massif (the center of the map) is the proverbial Valley of Death Where Fools Stay Well Away.  Lucky for you your commander has asked you to turn the Valley of Death into the epitome of Democracy.

Note, that the GM will control most of this, you merely say what you want.  So no need to read or remember all of this.  Though it may be useful to read once you wonder why your powerful force is unable to project all that nice 21st Century power.  Maybe some of those coins Alexander bribed his soldiers with to take out these tribesmen are still available.


So, onto the bases?


So, that is for the terrain, next to your men.

Friday, 30 May 2014

Kabir Campaign Lesson 1: Know your frenemies and enemies

Sun Tzu said you should know your enemies (and frenemies) to have a chance at victory.  So, here is how the influence peddlers in the campaign influence the actions of the UN/Russia/Rial.

In this campaign insurgents are rarely represented by actual units, instead they are akin to a background effect.  They may sometimes "sprout" into units, but under most conditions they are integral to the districts rather than a separate entity.  See the graphics below how the influence peddlers are represented in the VASSAL module.