Showing posts with label Insurgent. Show all posts

Saturday, 6 September 2014

Mission Briefing: The Rescue

The UN was a tad optimistic with their estimation of how rapid their advance would be.  They heralded the liberation of the Mithraist's in Ghani Bayt on the news channels of the world.  Unfortunately, they became bogged down in their advance.  Unfortunately, the Mithraists swarmed into the streets celebrating their liberation.  Unfortunately, the Woz Insurgents were in the vicinity.

So, the UN has thrown together a British flying column with orders to rescue two dozen Mithra men trapped in the Mosque and communal Grape Drying building in Ghani Bayt.  The Woz insurgents are intent on exterminating the last of this long diminished sect in Hotakistan.

The UN know that the Hotaki Woz are 2-3 dozen, and are likely to have IEDs.  The Woz have intelligence that are Mechanized Infantry platoon is approaching the town.

Map Overview
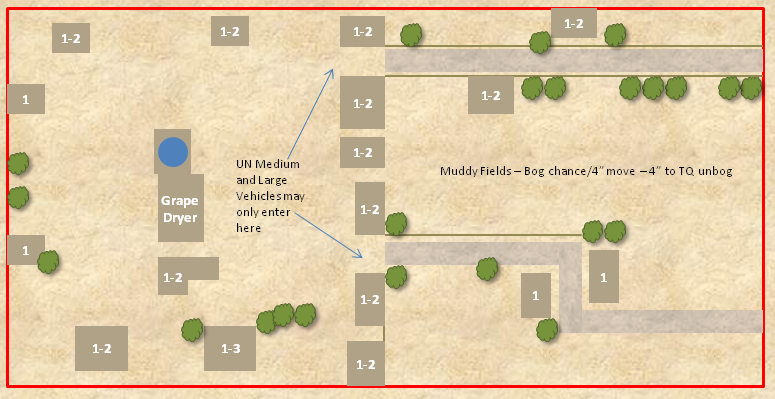
The mission has a "blind" aspect to it, with regards to forces and objectives.  So each side should not look at the map of the other side.


IF YOU ARE THE WOZ PLAYER LOOK AT THIS MAP


IF YOU ARE THE UN PLAYER LOOK AT THIS MAP


Tuesday, 3 June 2014

AAR - Ambush in San'boks City

With Kevin running off to 'forn parts' (well, Western Australia), we haven't done a lot of FoF in Brisbane recently. So I was more than happy - as well as a little anxious to see how it would play - to run a scenario for some new players to FoF. They were an enthusiastic bunch, who have done great job of building their forces and terrain (all in a very short time), and were keen to get to grips with the rules.

The scenario was fairly straightforward - a platoon of Americans in their Bradley IFV's are en route back to their base after a routine patrol. Passing through a small village, however, the third vehicle in the convoy is hit by RPGs and disabled; several of the occupants are wounded, and must be evacuated to safety. The insurgents close in, hoping to kill or capture Americans...

The leading Bradleys pass though the village...

The US commander was at the tail of the convoy, blocked off from the rest of his unit - the insurgents had pushed a car (the legendary Golden Holden, no less !) across the road. He quickly decided to dismount the fireteams from his vehicle to establish a perimeter. The other squads and their vehicles would help to secure the area, and recover the wounded. Once they were safe, he intended to evacuate them by the quickest route out of the village.

However, one of the premises of our campaign is that 'the enemy gets a vote'... RPG's and Dshka rounds rained down on the Americans from all sides. One fireteam was pinned down by a hail of fire from an alley, and took a further casualty; dragging him into the nearest building, he was discovered to be dead. Squad two backed their Bradley up next to the disabled vehicle, and debussed; one team decided to charge into the nearest group of insurgents hiding behind a truck, fully expecting to be backed up by the rest of their squad. The ensuing knife-fight left all four team members down; the other fire team remained in the vehicle (failed TQ to assault) - one man even claimed to have been wounded (Fog of War card, 'Man Down'), but was found to be unharmed when checked.
The combat around the truck

Another view of the failed assault
 At this point, superior discipline and firepower began to assert itself. Squad one established itself in a building overlooking the 'square', and provided effective overwatch; its Bradley levelled a building - together with a group of insurgents manning a Dshka - with a well-placed TOW missile (overkill, perhaps, but very effective). The team from Squad two was rescued and medicated, and all casualties were transferred to its vehicle.

The building after the TOW demolished it.
The platoon leader ordered his Bradley to push the Holden out of the road; its cannon made short  work of the insurgents in the alley.
The platoon leader cleans the alley of insurgents
 At this point, discretion was judged to be the better part of valour, and the Americans decided to withdraw with all their casualties. The insurgents were not able to hinder them further, as they had taken too many casualties themselves. However, the Americans had lost one killed, and six seriously wounded - a marginal insurgent victory.

Overall, an enjoyable game, and fairly tense at times when it looked as if the insurgents were going to overrun the Americans. The new recruits had some appalling dice rolls, but persisted in completing the mission, and will hopefully contribute to the new campaign that our 'evil genius' (Kevin) is putting together - see recent posts on this blog. I'm looking forward to it !


Sunday, 9 February 2014

AAR - The fight for Pavdullah's House

General Phil Graves looked at the weeks statistics for a second time, his casualty rate had decreased, and the UN’s rate was up.  This was not good, his troops were obviously not trying hard enough.  When he looked across the concrete runway to the Australian infantry readying their equipment he decided that they would immediately attack into the city.
 
The layout
Pavdullah sat on the top storey of "his house" looking westward to the beleaguered legations, he smiled, this was a perfect spot from which he could call down the 220mm rockets.  Before Pavdullah moved in, the building had been the “Malikastan-United Nations Youth League Outreach School for Transition”.  After Pavdullah kicked out the teachers the building became known as Pavdullah’s House.  The AUStralian-USA Force (AUSAF) also saw that the MUNYLOST building had unobstructed views to the last legations and too the airport itself.  The building had to be taken at all costs.

The Australian Lieutenant, Winston Hines, received his orders with incredulity, he was still waiting for his last ASLAVs to land.  He saw a group of South African mechanics repairing a bunch of “past best by date” Ratels, and asked to borrow a few.   Corporal H. Owzit agreed as long as he could join the Aussies in their attack.  The mechanics told Australian Lt Winston Hines and Sergeant Allan Lot that they also had found a British Challenger tank in a hangar and would bring that along for good measure. 

Thus it was that the Battle for Pavdullah’s House came to be.

The mission:
Australian Mechanised Infantry (8-10) + 4 Ratel/ASLAV
US ODA Team (10-10)
+Medic
+1FP for ODA
+155mm Artillery
+Apache Gunship
+1 Section of South African Infantry
(Reaction Card during game: +1 Challenger/Abrams Tank)

HVT Insurgents (8-10 regular)
Hardened Insurgents (8-10 regular) included one random T-55.
+Quad 14.5mm AA
+220mm Rocket Artillery
+RPG Team (AP3/AT3(H))
 
The entire mission plan.  
Pavdullah’s house was defended by a hardened insurgent platoon, with more allies on the way.  In a nearby warehouse the insurgents were rebuilding a T-55 that the Russians had damaged a few days earlier.  The insurgents were disastrously short of RPGs, but they did have a quad 14.5mm AA gun to keep the sky clear.  Pavdullah’s house was a monster of a building with thick concrete walls, and appeared to be more of a prison than a school.

The ODA team in Malika City heard that the Aussies (with a bunch of South African mechanics) were about to take on Pavdullah’s House and therefore thought it best if they came and showed the Aussies how to do it.   Pavdullah’s brother phoned Pavdullah and told him they had spotted the Australians advancing towards his position.  Pavdullah replied, “Not to worry, brother, I have just unwrapped a new state of the art RPG, let them come.”
 
Insurgent hunker down as the two Ratel's fire on the warehouse.
The attack started with the Australians infiltrating into the ruined buildings to the north of Pavdullah’s house.  The ODA joined this advance and also moved with two Ratel’s and a Australian GPMG team to take the ruin to the south of the “House.”  Some insurgents were spotted and engaged.  The Apache helicopter failed to arrive at first, but a 155mm stonk wounded several Hotakistani’s in the trenches to the south of the “House”.
 
The four 155mm shells land, causing casualties in the trenches and dropping the roof of Pavdullah's house onto the insurgents on the top storey.
The last section of Australians, a section of South Africans and the borrowed Challenger tank flanked the house and attacked the large factory warehouse from the south.  Though the Challenger would arrive late.  The T-55 in the warehouse burst through the massive roller doors only to have its gun shots away by one of the Ratel’s.  Amazingly in the wild melee to come the T-55 would survive to fight another day.

The insurgents in the thinly clad warehouse survived immense fire from the Ratel’s and ASLAV-25s though the building began to take on a Swiss cheese appearance.  Both sides refrained from further artillery as now the forces were only yards apart.  The insurgents proved very resilient to the fire and caused a few deaths amongst the AUSAF attackers, but eventually they started to accumulate wounds.

Two of the Ratel/ASLAVs were destroyed, one by the Quad 14.5mm and one by an RPG.
The Apache using Chin Sniping on the insurgents in Pavdullah's house.
The Apache eventually arrived, but failed to cause much damage.  The T-55 had retreated into the large warehouse, but eventually lost patience and charged through the remaining door and shot down the Australians beyond the door.  In the mad melee of men and machine the South African and Australians anti-tank men could not get a clear shot at the T-55.  With dozens of insurgents in the warehouse complex, gently caressing their Molotov Cocktails, the Challenger crew decided discretion was the right choice and remained in an overwatch position.

Eventually the Australians charged across the street between the ruins and Pavdullah’s House, finding the road covered with mines, but miraculously they all survived.
 
The Australians stack up for their assault on Pavdullah's House.  The glory boy ODA also approach the east wall to breach and clear.
It was by this time that Pavdullah gave his turban to his 2nd in command and slipped out of his house via the tunnel to the warehouse, he quickly ordered two teams of insurgents into the tunnel and told them to hold the house to the last man.  He then slipped away east to fight another day.  The insurgency could not afford to lose such an important man.
 
The Fickle Finger of Fate brushing off the Apache's second attack (presquished)
Two teams of Australians and the two ODA teams now stormed the “House” and in hand-to-hand combat dispatched the defenders on the first and second storey’s.  They also went into the basement to ambush anyone arriving by the tunnel.  The first insurgents to attempt entering the basement fell back under fire, and the second team decided they would “live to fight another day”.  The insurgents on the roof made a last, but futile, attempt to rouse the invaders from their building, but were killed.
 
The final insurgent assault is destroyed by the ODA team on the second storey.
Result: AUSAF Victory (3 floors in AUSAF hands vs. 2 in insurgent hands)

No one likes Stalingrad.  This was an obvious remake of the famous Pavlov’s House in Stalingrad.  It takes guts to attack such a structure, and guts to stand against an overwhelming force.

I only played the beginning, so much of the rest was observed from playing Pulp Alley at a nearby table.  I believe they say that the first casualty of war is Truth, and this may be true with this write up.

The mission was very basic in design, a map, a few rules for the buildings and the rest is history.  A two-legged dog?  Likely, but everyone loves Stalingrad…

While waiting for Eureka Miniatures, we substituted US for Australians, and used Ratels for the ASLAV-25s (I need to paint my ASLAVs!).

With the rampant defeatism circulating the ranks I think the following are a few wise words.

And Tolstoy had it right, "A battle is won by the side that is absolutely determined to win. Why did we lose the battle of Austerlitz? Our casualties were about the same as those of the French, but we had told ourselves early in the day that the battle was lost, so it was lost.” 

And Ho Chi Minh comes to mind, "We don't need to win military victories, we only need to hit them until they give up and get out."

Wednesday, 1 January 2014

Mission Briefing: The Valley of Fog

“War is an area of uncertainty; three quarters of the things on which all action in War is based are lying in a fog of uncertainty to a greater or lesser extent.” - Carl von Clausewitz

Mark asked for a little more fog in the mission, so I happily unleashed the puppies of Carl’s Dogs of Uncertainty!
Following the reversal at Budgie Smuggler Hill the Hotakistani forces fell back to regroup in a shallow valley to the NW.  They then planned to bypass the Australian defenses to the west.  The Australians, however, decided to preempt the next Hotakistani attack and pursued the Hotakistani forces into the shallow valley.


Turns: 8
Victory Points: Battle of Attrition, 5VP per Heavy vehicle, 2VP per KIA, 1VP per SW, 3VP for POW.  Vehicle crews do not count towards VP.
Initiative: Australia has Initiative in Turn 1, from Turn 2 roll for initiative.

Special Rules:
•          1/4 of the Hotakistani arrive as reinforcements.
•         1/4 of Hotakistani units setup visible (but are hidden if setup in concealing terrain), the remaining are secretly marked on the map in compounds or camouflaged adjacent to a compound wall.  The secret units can only react to AUSAF units if engaged before Turn 3 (must be spotted)
•        Hotakistanis that setup in fields may dig-in on TQ with -1 to roll.
•        Hotakistani armour must setup with 6” of each other as they are forming up to attack
•        Hotakistani infantry and support must setup in depth (4” between units) due to fear of artillery.
•        Hotakistani front line is a tree-lined shallow stream, double movement cost, and TQ or bog.   May make an immediate TQ to unbog and continue movement at cost of 4”.
•        Other streams are small and dry.
•        Compounds are Hard Cover +1, and 4D8 strength
•        The reinforcement card units are setup onboard on Turn 1
•        Each side places five markers onboard for improved artillery registration.
•        Hotakistanis can set up one forward position unit: a vehicle or squad 6” to 18” from the AUSAF edge.
•        Hotakistanis can set up one 6” wide and 2” deep hidden minefield between 12” and 30”

UN Forces
Heavy Artillery 155mm (Fatigue 4+ but with Five Staff so Fatigue is 1+)
Australian Infantry TQ8-MOR10 Fatigue 5+
Australian Heavy Armour TQ8-MOR10 Fatigue 3+ Very Confident
Close Air Defense TQ8-MOR10 Fatigue 2+

Hotakistani Forces
Hotakistani Infantry TQ8-MOR8-INI6 Fatigue 2+
Hotakistani Heavy Armour TQ8-MOR8-INI6 Fatigue 5+ (Staff III->2+) Confident T-72 (1x T-80)
220mm Heavy Rocket Battery Fatigue 2+
AA

What the Hotakistani and Australian player did not know:
Australians flanking units (Reveal Turn 4): arrive within 6” NE corner, but only arrive from Turn 4 on a TQ.
·        Bombardment (Reveal Turn 2): At the beginning of Turn 2 the board is subject to a late poor bombardment 10 random hits, Heavy Rocket Artillery Hotakistani, random direction from D8-D6 grid D8”.  Following the bombardment maximum LOS is reduced to 24” and optimum to 6” for Turn 2, and to 36” and 8” for Turn 3.  After that it returns to normal.  Units lost to the bombardment do not count towards VP.  Does not effect secret units.  All units within 12” of a impact must roll Morale or be pinned.
·        Secret Units (Reveal Turn 3): Only 1/2 of the Hotakistani force is actually setup on board, other setup units are written on the map.  Each time a invisible unit is spotted or activated roll a D6 on a 4+ it is offboard.  Any secret unit on Turn 3 is rolled for and is either placed on board at its location or moved to offboard reinforcements. They start to arrive from Turn 3 on the North edge (within 6” of the road).  And the last 1/4 arrives within 6” of the SE corner from Turn 3.  All reinforcements must pass a TQ to enter from Turn 3.
·        IED Markers (Reveal Turn 1).  The artillery registrations are actually potential IEDs.  AP6/AT3(M).  Each time a unit moves within 3” of one of these locations roll a D6, on a score of 6 the IED explodes attacking that unit.  On a 1-3 the IED is removed with no effect.  On a 4 the IED marker remains waiting of the next unit.  On a 5 the unit halts and the marker is removed.
·        Disgruntled Local Chief (Reveal Turn 1).  The Local chief, and ex-Malikastani Colonel with a hate for the AUSAF and Hots is placed in a random compound.  At end of each turn his force will attack any (closest) in LOS of the compound and will position to attack that unit.  He begins HIDDEN.  Leader x1 AK, RPGx1, x2 RPG (AP3/AT2(M)), x5 AK,  Regular TQ8/MOR10.  Any Hot units in this compound are moved to offboard reinforcements.
·        Malikastani Independent Spiritual Students Youth League (Reveal Turn 3).  The MISSYL is a growing force in Malikastani, led by a young charismatic leader whom preaches that the sight of the beginning of the Apocalypse is in Malikastan.  TQ6-MOR12 Irregular – Use 2nd Reinforcement table.  They never have leaders.  They always have their turn last.  They do not count towards VP.

So, basically, the Fog of War is implemented as hidden units, hidden units which both sides do not know do not exist, a artillery barrage, flank entry points which have moved and third force insurgents and warlords who are unfriendly to all foreigners.


Sunday, 14 July 2013

AAR - They are like zombies!

The hordes of insurgents surged through the now undefended legation district, like zombies they ran past an ODA group and a Malikastani platoon which were in the process of searching for civilians.  The ODA were also attempting to retrieve the body of their commander, while the Malikastani's were intent on rescuing their president.  The Russian consulate officer also needed rescuing.  It would prove a hard set of objectives.

Mission outline here: http://bigfof.blogspot.com.au/2013/07/mission-they-are-like-zombies.html

The reinforcement cards for the two forces:
UN1 ODA Team (so a 3rd team)
UN2 Convoy of three Light APC (VAB)

Hotakistani1 Squad of paratroopers
Hotakistani2 Flamethrower
The Field of Battle
Two groups of insurgents had passed the forward ODA and Malikastani positions before the sentries had realised that they were insurgents.

The celebrating voices of the advancing insurgents was interrupted by an insurgent rocket barrage.  Rockets crashed into the buildings and streets, collapsing roofs and throwing shrapnel across the streets.

It did not take long for the ODA and Malikastanis to recover, and both Haqiqa units were brought under fire, one destroyed in the chicane outside the Russian consular building, the other badly mauled in the street in front of the MOFUC building.
The opening dispositions


The opening salvo of insurgent rockets and the opening engagements
While the Malikastani commander and his radiomen repaired the two HUMVEES, his one squad finished off the insurgents in the road before the Russian consulate.  The ODA in the tall building fired down into the insurgents in front of the MOFUC building, causing a few injuries.  The Malikastani's in the blockhouse moved forward to save their president, but took fire and lost one man wounded before getting into the building and making contact with the president.

The ODA searched a floor in their building and found no civilians, all in all not many non-Malika civilians were left in the area.  Just then a convoy of French VAB's (manned by Malikastanis) arrived to rescue the president.  A squad of Hotakistani paratroopers hearing the gunfire also arrived, armed with a flame-thrower.
The paratroopers made haste towards the ODA building and fired their flamethrower, the ODA survived without injury, but they quickly fell back escaping the smouldering building.  A suicide bomber chased after the special force operators, he surprised the ODA team and  blew himself up...but it was more fizzle than bang (1,1,1,2!).  In the field north of the garage complex insurgents began to form and were shot down by the 2nd ODA team.  This field would contain scores of dead insurgents by the end of the day.
Out of the flame-thrower into the exploding insurgent
The convoy of VABs moved to the front of the MOFUC building.  They engaged the paratroopers with their HMGs, and were supported by the arrival of a third team of ODA at the roadblock.  The flame-thrower soon covered the first VAB with fire, but it survived.
The paratroopers take on the convoy and the ODA
The two HUMVEES also advanced, ready to pick up any civilians discovered by the ODA or Malikastani teams.  An insurgent technical now arrived in the open ground north of the garage.  This vehicle was to live a miraculous life, the ODA poured fire into the truck, but did nothing (turn after turn after bloody turn!).  By the end of the battle the swiss-cheese truck drove off on its rims, but it still drove.
The new terrain pieces: Marsh and wire fence.
A squad of Malikastani's moved to the top storey of the building overlooking the open lot and fired, giving and receiving.  

The ODA in the garage discovered two groups of civilians and called the Malikastani commander in his HUMVEE to come and extricate the civilians.

It was about now that insurgents broke into the rear of the MOFUC building, but were wiped out by the Malikastani soldiers protecting the President.

Meanwhile, the Malikastani President and his four bodyguards made a dash for the waiting VAB, they closed the doors just as flame enveloped the vehicle from the paratroopers flame-thrower.  The VAB survived.  But they were not safe, yet.  A two-man RPG team appeared from around the corner and fired, but failed to penetrate, then a mob of insurgents with Molotovs clambered onto the vehicle, but to no avail.
Insurgents clamber over the presidents VAB, while the gunner on the 2nd VAB is wounded.
The newly arrived ODA team and the VAB guns threw back the paratrooper RPG team with three casualties.

Two Malikastani soldiers now entered the Russian consulate and the Russians and Malikastani's headed to safety while the ODA and 3rd Malikastani squad covered them.
Russians head for safety.
Just as they ran a Frogfoot flew in and let loose a salvo of rockets, the rockets exploded down the street, wounding a Russian consular officer, a Malikastani overwatch soldier and a member of the ODA at the HESCO roadblock.
Rockets explode down the street
Just when things were looking good ... disaster struck, the VAB with the president rev'ed.  The supporting VAB cleaned the insurgents off the presidents vehicle, then the presidents VAB sped off.  An insurgent inside the MOFUC building fired a RPG which struck and destroyed the VAB.  The crew, bodyguards and president leapt from the burning VAB only to be struck by the paratroopers flame-thrower and a second RPG.  The whole Malikastani group went down and would remain in the street for a long time.
The president caught between two RPGs and a flame-thrower
Around the corner, near the golden Holden, insurgents were now moving through the parked cars, they engaged the HUMVEE manned by the radio operator, and were in turn engaged by the ODA who had entered the building.  Then the Russians tried to move but were brought under fire.
Insurgents fire on the Russians but then fall to the ODA from the building above them.
The civilians in the garage loaded into the HUMVEE and speed off, dodging any insurgent fire.  With the road through the back of the tall buildings blocked by the now burning HUMVEE the driver decides to drive across the marsh.  Just then a large bomb lands on the Russian consulate and is destroyed, showering all close by units with shrapnel.
The HUMVEE struggles through the marsh, while the Russian consulate vanishes in a bomb blast
The last two VABs are destroyed just as the insurgents are reinforced by a T-55.  The T-55 is soon hit by a Malikastani RPG, doing light damage, but the crew bailed.
VABs destroyed by RPG while a T-55 arrives, only to be hit and bailed.
Insurgents in the square tall building are engaged by the ODA, while insurgents march on the presidents body.

The ODA team in the southern tall building get ready to bring in artillery danger close as a last desperate [but UN player decides to clear out the HUMVEE first, and allow the civilians to escape...a bad mistake!].  The escaping HUMVEE is also ambushed and destroyed, in the process the UN loses contact to the artillery [card draw on Reaction roll of 1].

The ODA exchange fire with insurgents across the alleyway.  While Russian special forces arrive at the bunker.
THE END.  Insurgents descend on the president's body, he is found to be dead, but one of his bodyguards is found alive and captured.  And then disaster, a group of insurgents break into the tall ODA building, the ODA fire at the onslaught only wounding one enemy.  And then it is bayonet work.  The ODA fail completely, unable to even wound or kill a single insurgent, all but one ODA team member is killed, the last surviving ODA team member becomes a prisoner.
President down - HUMVEE down and ODA down - in one turn the turns have tided

[In three foul swoops the insurgents go from behind in points to way ahead, victory is beyond the UNs grasp.]

Insurgents: 39VP
UN: 16VP

Comments: Hmm, well the enemy does get a vote!  The ODA with MOR8 suffered, but the insurgents were patient and nasty and were willing to sacrifice.  What went wrong for the UN?  One major problem was not being able to give mutual support between units.

An interesting game, the moving hotspots proved a good idea.

The wire-mesh fences make an interesting terrain type, they give no cover but restrict movement. 

Tuesday, 8 January 2013

AAR - Retaking the Airport Gate

Major Heidi Clare visited the US Lieutenant early in the morning to reiterate the importance of his mission: the capture of the Malika City Airport.  He did not need a reminder, it was obvious, without the airport in UN hands Malika City would probably fall before UN reinforcements could land to the south east and push to relieve the city.  The Major emphasized the importance of the attack by supporting the attack with her only main battle tank, a Challenger II, which had just arrived in a transport convoy before the war started.

Mark went schizophrenic and played the insurgents (he commands the UN force in the campaign), while Kevin and Shane took the UN forces. It was a pleasant game with lots of jibes!

Turns: 6
Objective: Attacker must push the defender out of two thirds of the board measured from the attackers friendly edge.

UN Forces involved (ATTACKER):
US Infantry Platoon (INI8 TQ8 MOR10)
South African Infantry Platoon (INI8 TQ8 MOR8) Minus one infantry section
One Challenger II (INI8 TQ8 MOR10)
81mm Mortar Battery Support

Hotakistani and Haqiqa forces involved (DEFENDER):
Hotakistani Paratroopers (INI8 TQ8 MOR10) minus one infantry squad
Haqiqa Insurgents (INI6 TQ6 MOR12)
Ground Attack Fixed-Wing Aircraft (TQ8)
JTAC
Sniper Team

The field of battle - The Malika City Airport Gate Area - View from the South
The plan was to relieve the UN defenders at the airport, who were starting to show signs of cracking under the strain.  The first bound of the plan was to retake the airport gate and administration complex.  The lieutenant had a full platoon of US Infantry and three quarters of a South African infantry platoon.  The only transport available was a dozen Jingly Trucks.  The troops mounted before dawn and drove towards the airport on the back roads.  Dismounting in the dark they approached the outer chain-link fence, cleared the mines and cut-back the razor wire.

Surprise was 100%.  The Hotakistani paratroopers were enjoying a stolen breakfast outside the main canteen building near the gate when the first US troops were spotted by the JTAC in the Customs and Excise building.  The US soldiers had cut through the outer wire fence and then proceeded through the fields within the security zone of the airport.  Using the ditches they were able to move to within 100 yards before they were spotted.

Meanwhile to the left of the US advance the South African's moved to outflank the Hotakistani's and approached the gate directly and from the south.
The US attack bumps into the Hotakistani Paratroopers who are enjoying breakfast "liberated" from the UN Canteen
Within moments of being discovered a fierce gun battle erupted.  The Hotakistani paratroopers had a field day with the US having to traverse open ground to get to the safety of the effluent filled drainage ditches.  A fire team of Hoatakistani's entered the canteen to deny the UN the building, however, they ran into the combined fire power of half the US force, and then fell to an assault.  The South African's had meantime arrived and engaged the paratroopers near the bunker, the South African GPMG gunner was hit, and would be wounded 5 more times before the day was out, but kept on fighting throughout the day.
A fierce fire fight erupts.
The US found they could not move without sustaining casualties, and as the US assaulted the canteen building and despatched the defenders a bomb dropped from an Hotakistani SU-25 Frogfoot.  The bomb all but demolished the buildings, and the more US soldiers were wounded.  The building began to collapse.
The firefight escalates, with the arrival of a captured T-55 and a Frogfoot dropping bombs danger close to the Hotakistani Paratroopers.
Before the T-55 caught do much damage the Challenger rumbled into the battle and without fan or fare destroyed the T-55.  The paratroopers had realised it was a no win situation and bailed out before the vehicle was destroyed.
Challenger destroys the T-55 while the canteen continues to collapse.
The first insurgents began to arrive, a technical with a ZPU-2 and a RPG tank hunter, after a few exchanges both were destroyed.  The RPG gunner fired his RPG into the front armour of the Challenger from behind a Land Rover, the man was peppered with the co-axial MG and he slumped to the ground, dead.
Meanwhile along the wall the Hotakistani's were beginning to suffer casualties, once they were suppressed, killed and wounded the US was able to advanced.  The Hotakistani's near the bunker now manned the bunker and it began to look like they were invincible.
The US assault the down paratroopers and finish them off.  Insurgents surprise the South African reading themselves to assault the bunker.
The bunker was suppressed and then covered in smoke by UN 81mm mortars.  The insurgent technical was then destroyed by the Challenger.  Just when the South African's were about to finish off the bunker they were surprised by insurgents, but lucky the insurgents seemed to have been trained in the Marx brothers school of insurgency, and failed to do much, initially.  Eventually reacting to the South African's they managed to kill two of the South Africans.  The Hotakistani JTAC continued to direct the SU-25 which hit the canteen building three times, resulting in the building collapsing further and wounding more Americans.  The JTAC was eventually neutralised by a US fire team which moved around the ruined canteen and brought fire to bear on the observer in the top storey of the Customs & Excise building.
The end - The bunker was down, the insurgent reinforcements were down.  The final insurgent Hoorah! is ended by the combined fire of the US, South Africans and tank.
Eight UN soldiers were killed and over a dozen wounded.  The Hotakistani's lost nearly every man except for the one team of snipers.  The South African's complained that the US had dropped a smoke grenade on their position resulting in a shift of fire from the US to the South Africans!

By the end of Turn 6 the UN had pushed the Hotakistani's off 2/3 of the board and had obtained 43VP. Nearly double that of the Hotakistanis.  So I decisive victory for the UN without losing 25VP

Fatigue: +1 for UN, +3 for Hotakistani forces

The tank was useful, but other than destroying the enemy vehicles was rather useless against the infantry.  The two attempts by the insurgents to destroy the tank with RPGs was laughed off by the Challenger's frontal armour.

Lessons applied:
1) Finally using suppression fire more often, though against MOR12 insurgents...
2) Finally using smoke!  Grenades, 60mm mortar and 81mm Mortar Battery

Lessons learnt too late (UN):
1) Failed to have a reserve to exploit their successes: Squandered Opportunity!
2) Air attack, no matter how pathetic the TQ, is always dangerous when it has a AP10 bomb!
3) The field was far more open than first assumed!  The US battled to move without taking hits

Figures used: Peter Pig for South Africans (using PP Israelis) and US Infantry, Eureka Miniatures Russians for the Hotakistani paratroopers, and a mix of sources for the insurgents.  Buildings homemade, or from Gamecraft (including the HESCO).  Utes by Peter Pig, other vehicles 1/87.  I believe the Challenger is QRF.  Pre-fab buildings are GZG.  Sand bag emplacements are Battlefront NZ.  The T-55 is Skytrex. And the Articulated Dump truck I believe is CAT.


Monday, 12 November 2012

UN fails to make headway in Malika City


We played the fight in north Malika City, a platoon of HQ security and a platoon of Malikastanis, with a special force unit in support, took on two Haqiqa foreign fighters groups, supported by two T-72’s.
MC1 and MC3 fights L3 and MP1
Major Heidi Clare's Audacious Attack Failed

The UNSAF(East Malikastan) spokesperson, Major Heidi Clare, found herself in command of the UN forces in Malika City following the death of the General in a car-bomb blast.  Instead of sitting in the legation district, and waiting for relief forces to arrive, she hatched an audacious plan to not only free Malika City from the insurgents, but then to advance and clear the airfield.

Firstly, she sent a platoon to the south of the city and a platoon to the west of the city to guard those approaches, and then she contacted a group of Australian SASR (who were busy hunting Haqiqa to the east of the river) and requested they cross over the river and secure the eastern flank of the city.  She then personally led a platoon of Malikastani infantry and her HQ group to the north to clear the city of Haqiqa.

This attack came as a surprise to both the Hotakistani’s in Malika City.  In fact, the UN HQ security platoon was surprised even more so when Major Heidi Clare declared her intention to free Malika City from the clutches of the Haqiqa.

Moving north through the streets the platoons managed to stay in line a breast and were joined by a four man team of special forces from the US HVT hunting contingent.  What was to ensue was a bloody close quarters fire fight in which both sides suffered casualties and no one gained an advantage.
Major Heidi Clare led from the front, maybe because of criticism from Major D. Zaster, but she was generally more forward than the majority of her men.
The first contact occurred between an insurgent group in a five storey building open fire on the two lead US infantry fire teams, both US fire teams sustained casualties before entering the building.  By the battle end four of these men were seriously wounded and the remainder lightly wounded.  But in the end they captured the building and destroyed the Haqiqa insurgent defenders.
The US point fire team coming exchanging fire with the Haqiqa
Across the street, a second insurgent team held a position from which they could bring fire to bear on all advancing UN forces, they were to be a thorn in the UN’s side for the remainder of the day, and were one of the major reason for the eventual withdrawal of the UN forces.

The Malikastani platoon, men from northern Malikastan, had no love for the Haqiqa and advanced boldly along the central and eastern flank.  The central Malikastani force walked into a captured T-72, they fled to cover but suffered casualties from the Haqiqa in the 2nd building and from the machine guns on the tank.  A US GPMG tried to attack the Haqiqa in the second building, but fell to returning fire.
US pushing forward and trying to bring fire to bare on the central buildings defenders.  The T-72 fell back from this position following the special forces unit attempting to flank it. The US team on the roof of the mosque destroys the technical.
The T-72 retreats under threat from the special forces in the central building.
The special force unit entered the 2nd building, but were spotted before they could fire the AT-4 at the side of the T-72, the T-72 reversed and the AT-4 exploded harmlessly against the ERA on the front of the tank.

Meanwhile, a technical sped towards the US forces on the western flank, but was soon destroyed by a LAW.  The US and Malikastani forces brought heavy fire to bear on the Haqiqa in the second building, but to no avail.  When Haqiqa started to reinforce the building the special forces moved up to block any movement from the top storey.  A dozen insurgents fell upon them with complete surprise and massacred the team.  At the same time the US in the first building suppressed the defenders and two if the team bravely charged in killing all the defenders.
The special force team is overwhelmed and destroyed.
Further tit-for-tat fire ended the day, both sides uncertain of their position fell back and the centre of Malika City was left to the city’s lost dogs and not so lost rats.

Both sides scored 25VP.  A draw.  The mission design for an insurgent-only force needed a few adjustments.  Better chances of getting reinforcements to compensate for the loss of hotspots, or maybe units which fail to arrive at hotspots enter on the friendly edge.  Will also simplify the force selection for the insurgents.

The rules and support cards have been updated form lessons learnt.

Hotakistani 25VP [Fatigue: +2, fought battle, gave away +25VP]
UN 25VP [Fatigue: +2, fought battle, gave away +25VP]